Using Visual Studio Online Build Services for a MSBuild/xproj free deployment.
So my laptop was in for repairs so I decided to dust off my old Macbook Pro. I upgraded to Yosemite, downloaded VSCode and ran through the the setup for DNX on Mac. Very quickly I started to wonder about deploying to Azure.
I had previously used the steps described here to deploy a Visual Studio 2015 ASP.NET 5 project from Git but that relied on an xproj file for publishing.
The other option is publishing to Azure via source control as described here.
I wanted something similar to the 1st option but for a solution created in VSCode and the aspnet Yeoman generator though so what follows is what I have come up with so far.
NOTE: The project structure could use some work but the scripts work.

Step 1: Project Setup
The publish script uses the global.json file to determine the version and runtime. In the root is also Publish.ps1 and Upload.ps1 powershell scripts.
Example
Global
Setup the global.json file with properties needed for the publish.
Publish script
This script does a couple things along the way to publishing a folder for deployment.
- Bootstraps DNVM into the Powershell session
- Installs DNX on the build host
- Restores the packages for the project using
dnu restore - Packages the project using
dnu package - Copies the runtime foler into the package (I think dnu restore is supposed to do this but at time of writing it was not)
- Sets the web.config DNX version and runtime
Upload Script
This is a script found here davideicardi/kuduSiteUpload.ps1 which worked like a charm.
UPDATE: I changed this script to stop the website before upload and start it again after as deployment was failing regularly with a 500 server error. My guess is locked files.
VSOnline Build Setup
Step 1: Publish
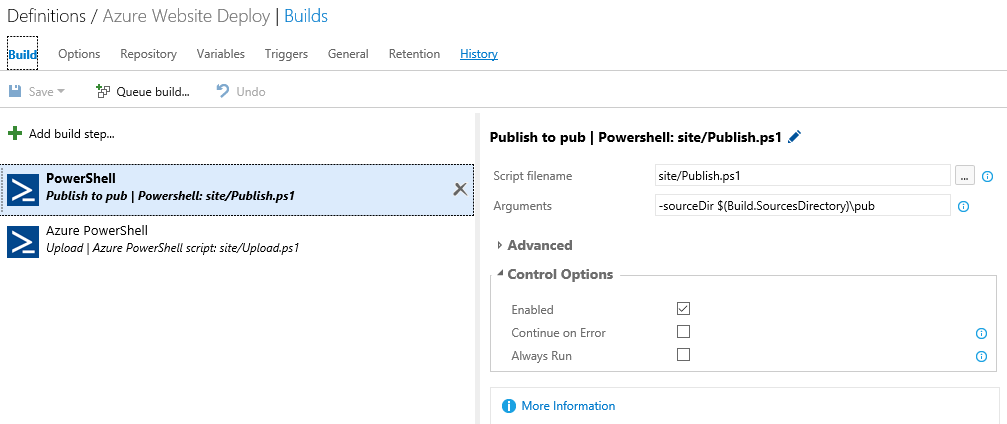
Firstly we add a PowerShell script and point the script at our publish script:
- Script fielname: site/Publish.ps1
- Arguments: -sourceDir $(Build.SourcesDirectory)\pub
Step 2: Upload
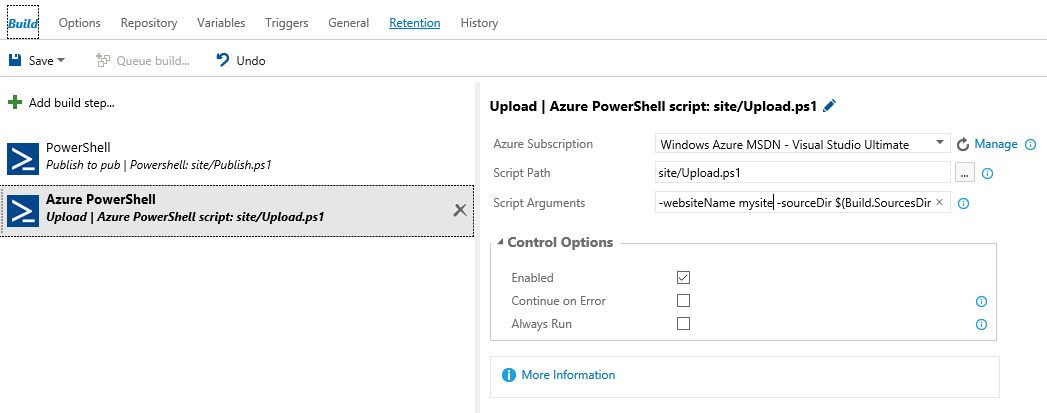
Next we setup the upload script by creating an Azure PowerShell script:
- Azure Subscription: If you do not have one setup click Manage to do so
- Script Path: site/Upload.ps1
- Arguments: -websiteName MyWebSite -sourceDir $(Build.SourcesDirectory)\pub -destinationPath /site
Where MyWebSite is the name of the website in Azure.
Hit Save to save the build configuration.
Step 3: Setup CI (optional)
If you want CI you can go to the Triggers tab and set a build to trigger on commit to a branch.
- Select CI.
- Select Batch changes
- I filtered on master branch. Choose whatever is applicable.
Hit the Save button.
Step 4: Test your Build
Now you can either hit Queue build… or if you setup CI do a push to the trigger enabled branch. Note that the triggered build can sometimes take a few minutes to be queued and takes almost 5 minutes to build and deploy even for a small test site.
Conclusion
Thats it for deploying to Azure with a solution developed on OSX (or Linux). Just 2 scripts really.
I hope this helps someone and please leave a comment below if you have any questions or suggestions. Or just want to say it helped 😃