In this final post in the series we are going to create a fully functioning F# application. Along the way we will discuss the .NET SDK, SQLite, and how to organize your code. If you follow along (which I recommend you do), you will have a working F# console application that accepts input and communicates with a database.
The code for this tutorial can be found at Github.
Introduction
First let's discuss what we will be building. We will be creating a console application that accepts some contact information as user input and then persists those contacts to a database.
The data we will be capturing will have the following fields:
- First name
- Last name
We will be doing the initial creation of the project from the command line so it doesn't matter if you are using VS Code, Visual Studio, Rider, or any other preferred editor on Windows, Linux, or Mac.
Project setup
The first thing we need to check is if we have the .NET Core SDK installed. Go to dot.net and download the .NET Core SDK.
And although I hope you tried out some of the samples in previous posts, if any this would be the one to follow along with if you have never written a F# application before. To do that you will need an IDE.
- Visual Studio with the F# workload installed
- Visual Studio Code with Ionide extension installed
- Rider
Once we have the .NET SDK installed, create a folder and navigate to that folder in your terminal (Prompt on Windows or Terminal on *nix).
If you are unsure there is an awesome video series by Compositional IT on YouTube now that will get you setup.
On Windows using Powershell I did the following:
cd C:\dev\personal\
mkdir HowToFsharp
cd .\HowToFsharp\
So I am in a folder C:\dev\personal\HowToFsharp. You can put the folder anywhere you prefer and call it what you like, it is not too important. Just be sure that you execute the following command in the folder you just created:
dotnet new --list
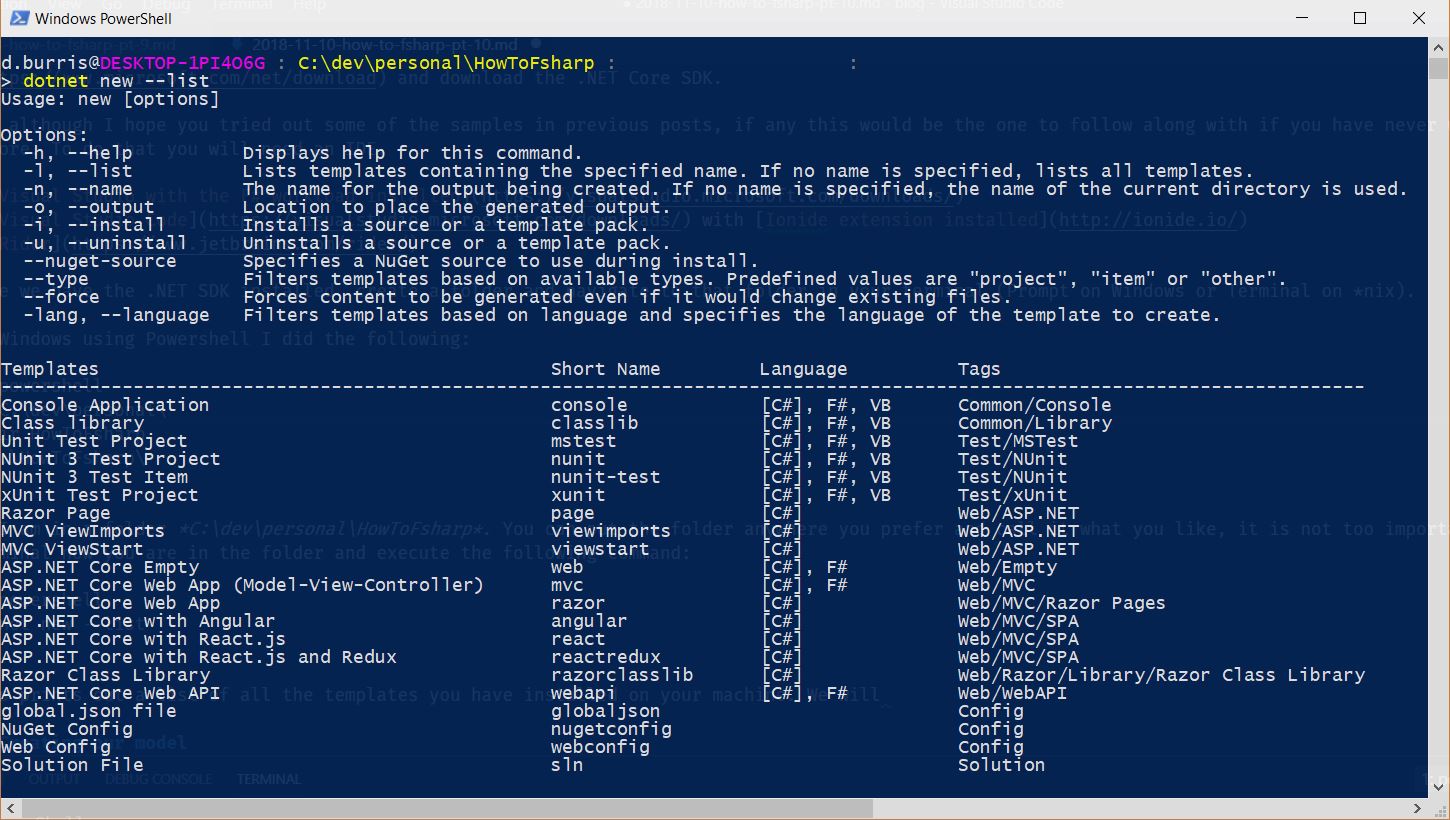
This prints out a list of all the templates you have installed on your machine. We will be creating a console application so we will use the first template on the list above.
dotnet new console -lang F#
Running this will generate 2 files and another folder called obj which we won't be looking at. Let's look at the 2 files though.
HowToFsharp.fsproj:
<Project Sdk="Microsoft.NET.Sdk">

  <PropertyGroup>
    <OutputType>Exe</OutputType>
    <TargetFramework>netcoreapp2.1</TargetFramework>
  </PropertyGroup>

  <ItemGroup>
    <Compile Include="Program.fs" />
  </ItemGroup>

</Project>
The *proj files like csproj and fsproj MSBuild XML files that specify how our project is built. The first thing to notice is it is specifying Microsoft.NET.Sdk as an attribute in the root Project element. This layers in tasks and targets automatically for us to work with .NET Core.
OutputType is quite straight forward. The artefact of this program will be an executable that can be run.
With TargetFramework we indicate what framework we are targeting. netcoreapp2.1 is for runnable .NET Core applications. If we wanted to target .NET Fullframework we could specify something like net461. That is not too important for this post though, just useful to keep in mind when developing your own applications.
Finally we have an ItemGroup with <Compile Include="Program.fs" />. This is important as it includes our other file of interest that we will look at next to be compiled when compiling this project. In an F# project file this is important as this allows us to specify what is compiled and in what order. If you are used to C#, this is different as the order of files does not matter in C#. The important part to note here is that as we add more F# files, we will need to add them here so they are compiled as needed.
Program.fs
open System

[<EntryPoint>]
let main argv =
    printfn "Hello World from F#!"
    0 // return an integer exit code
Program.fs becomes the entry point of our application (as is made explicit by the [<EntryPoint>] attribute).
On the command line if you are in the folder containing the fsproj file you can run the command dotnet run command to build and run this program.
dotnet run
Hello World from F#!
Before we get to writing our program, let's talk about organizing code.
Organizing Code
So far in this series we haven't talked about how to organize code. In your F# code you typically have 3 aspects to bring together to organise your code. Firstly, you have files. These are files ending with .fs. Pretty straight forward. As mentioned before .fs files need to be compiled in the order they are used. So if You depend on functions or types in another file, that file must appear ahead in the compilation order of the file they are used in.
The bread and butter of organizing F# code is modules. A module allows you to group values, types, and functions. This can be useful for thinking of the group as a single abstraction and avoiding naming conflicts. When interoping with other .NET languages, modules show up as static classes.
Lastly, there are namespaces. These are an artefact of the interop with the rest of the .NET library although they can be useful for spanning multiple modules. One important thing to note is that although we can define types in a namespace, we cannot define values. This includes functions.
We will be coding up the following:
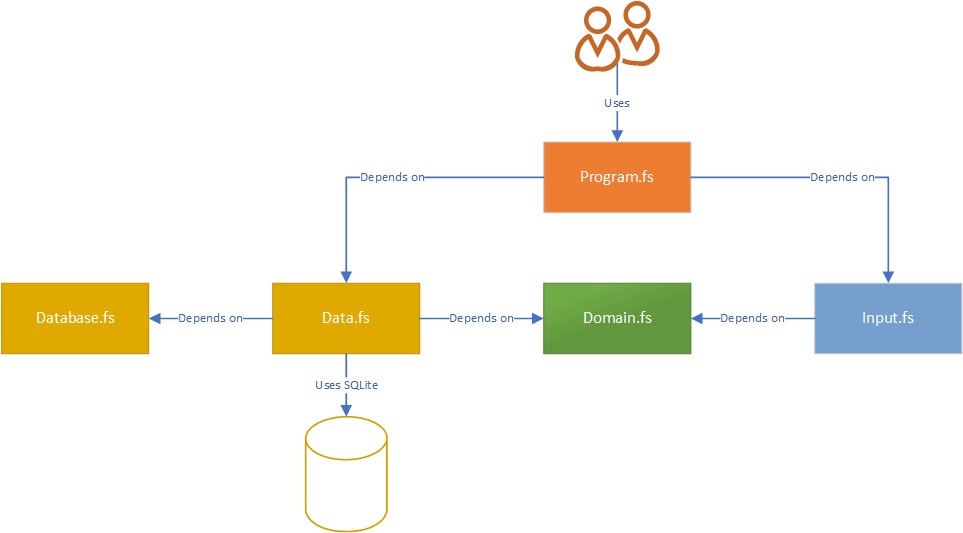
As we discussed, Program.fs represents our entry point. All other files contain modules in the Contacts namespace.
Creating our model
We will start with creating our Domain.fs file. There are multiple ways to organise code with or without namespaces but I am showing my preferred method. We have a namespace, in this case Contacts that all the code falls under. We create our types within that namespace. Any domain logic we need enforced on our types, we place in a module with the same name as the type.
Domains.fs:
namespace Contacts

open System

type Contact = {
    Id:Guid
    Firstname:string
    Lastname:string
    Email:string
}

[<RequireQualifiedAccess>]
module Contact =
    // string -> bool
    let private isValidEmail (email:string) =
        try
            new System.Net.Mail.MailAddress(email) |> ignore
            true
        with
        | _ -> false

    // Contact -> Result<Contact,seq<string>>
    let validate contact =
        let errors = seq {
            if(String.IsNullOrEmpty(contact.Firstname)) then yield "First name should not be empty"
            if(String.IsNullOrEmpty(contact.Lastname)) then yield "Last name should not be empty"
            if(String.IsNullOrEmpty(contact.Email)) then yield "Email should not be empty"
            if(isValidEmail contact.Email |> not) then yield "Not a valid email"
        }

        if(Seq.isEmpty errors) then Ok contact else Error errors

    // string -> string -> string -> Result<Contact,seq<string>>
    let create fname lname email =
        let c = { Id = Guid.NewGuid(); Firstname = fname; Lastname = lname; Email = email }
        validate c
Above we have a type Contact and a module Contact. Within the module we have 2 public functions. create creates a contact given the needed values, and uses validate to ensure the contact is valid.
I find this a nice structured way of finding the necessary behavior on a type that is similar to how behavior would be discovered using OO, is still functional, and matches how we work in F# with types like List and Option.
Getting input
Next, let's look at how we can get input from the user console. We will be catering for the following functionality.
- Print a menu to the console
- List all existing saved contacts persisted to the database
- Capture new contacts to the database
The menu will look like this:
====================
MENU"
====================
1. Print Contacts"
2. Capture Contacts"
0. Quit"
With this bit of code, consider reading it from the bottom up. This way of reading code often makes the most sense as the upper functions are helper functions for those lower down.
namespace Contacts

[<RequireQualifiedAccess>]
module Input =

    open System

    // string -> string
    let private captureInput(label:string) =
            printf "%s" label
            Console.ReadLine()

    // seq<string> -> unit
    let private printErrors errs =
        printfn "ERRORS"
        errs |> Seq.iter (printfn "%s")

    // unit -> Contact
    let rec private captureContact() =
        printfn "CAPTURE CONTACT"
        Contact.create
            (captureInput "First name: ")
            (captureInput "Last name: ")
            (captureInput "Email: ")
        |> fun r -> match r with
                    | Ok c -> c
                    | Error err ->
                        printErrors err
                        captureContact()

    // (Contact -> unit) -> Choice<unit,unit>
    let private captureContactChoice saveContact =
        let contact = captureContact()
        saveContact contact
        let another = captureInput "Continue (Y/N)?"
        match another.ToUpper() with
        | "Y" -> Choice1Of2 ()
        | _ -> Choice2Of2 ()

    // (Contact -> unit) -> unit
    let rec private captureContacts saveContact =
        match captureContactChoice saveContact with
        | Choice1Of2 _ ->
            captureContacts saveContact
        | Choice2Of2 _ -> ()

    // unit -> unit
    let printMenu() =
        printfn "===================="
        printfn "MENU"
        printfn "===================="
        printfn "1. Print Contacts"
        printfn "2. Capture Contacts"
        printfn "0. Quit"

    // string -> (unit -> Contact list) -> (Contact -> unit) -> unit
    let routeMenuOption i getContacts saveContact =
        match i with
        | "1" ->
            printfn "Contacts"
            getContacts() |> List.iter (fun c -> printfn "%s %s (%s)" c.Firstname c.Lastname c.Email)
        | "2" -> captureContacts saveContact
        | _ -> printMenu()

    // unit -> string
    let readKey() =
        let k = Console.ReadKey()
        Console.WriteLine()
        k.KeyChar |> string
The first thing you may notice (if you did still start from the top) is the RequireQualifiedAccess attribute. This enforces that calling the functions in the module is done using the fully qualified module name. I often like this as it gives context to the function call names.
Now that you have been found out for starting from the top, let's work our way up from the bottom.
readKey is pretty uninteresting. It gets a key as input and returns that as a string. This will be used to get menu choices.
routeMenuOption pattern matches on the i. “1” prints out each contact. To do that it calls the getContacts function that is passed in as an argument. This means we are not directly tied to fetching our contacts from the database when using this Input module, we need only supply a function with the signature unit -> Contact list.
“2” is a little more interesting as we call a function captureContacts which is in this Input module. It takes as an argument the function saveContact which has the signature Contact -> unit. So again, the Input module is not dependent on storing contacts in a database. All it requires is a function that will do something with the Contact.
Let's drill into captureContacts then. It has the signature (Contact -> unit) -> unit, so its argument matches up with our saveContact function. Another interesting part about captureContacts is the rec keyword. This means that the function is recursive. That is a fancy way of saying it calls itself. So what it does is make use of the captureContact function which returns back a Choice type. Choice1Of2 means we will capture another contact, Choice2Of2 means we will not capture any more contacts.
The rest of the functions printMenu, printErrors, and captureInput should be simple enough to reason about by now.
Persisting data
Next we need to setup our data access. I am not going to go over the code too much in this section as it is basically the same as what we covered in Part 9.
Database creation
What is important is to be able to work with SQLite. To follow along here you can download sqlite-tools for free for your platform. You will either need to put sqlite3 on your PATH or call it from where you downloaded it. You could also use a tool like Jetbrains Datagrip.
Once we have the sqlite binary we can create a new database and connect to it using the following command:
sqlite3 contactsDB.sqlite
sqlite> CREATE TABLE IF NOT EXISTS contacts ( id TEXT PRIMARY KEY, firstname TEXT NOT NULL, lastname TEXT NOT NULL, email TEXT NOT NULL UNIQUE );
It should look something like this, depending on your operating system and terminal of choice.

Install nuget packages
So now we have our database setup, we are going to start with the code to connect to it. First we will install the Dapper package into our project.
I would usually recommend dependency management Paket. I have a post on getting up and running with Paket if you are interested.
Run the following commands:
dotnet add package Dapper
dotnet add package System.Data.SQLite
dotnet restore
Your HowToFsharp.fsproj should now contain the following ItemGroup element.
<ItemGroup>
  <PackageReference Include="Dapper" Version="1.50.5" />
  <PackageReference Include="System.Data.SQLite" Version="1.0.109.2" />
</ItemGroup>
We are going to add some code we saw in Part 9. Database.fs is a helper module for using Dapper in a more functional way.
Database.fs
namespace Contacts

module Database =

    open Dapper
    open System.Data.Common
    open System.Collections.Generic

    // DbConnection -> string -> 'b -> Result<int,exn>
    let execute (connection:#DbConnection) (sql:string) (parameters:_) =
        try
            let result = connection.Execute(sql, parameters)
            Ok result
        with
        | ex -> Error ex

    // DbConnection -> string -> IDictionary<string,obj> -> Result<seq<'T>,exn>
    let query (connection:#DbConnection) (sql:string) (parameters:IDictionary<string, obj> option) : Result<seq<'T>,exn> =
        try
            let result =
                match parameters with
                | Some p -> connection.Query<'T>(sql, p)
                | None -> connection.Query<'T>(sql)
            Ok result
        with
        | ex -> Error ex

    // DbConnection -> string -> IDictionary<string,obj> -> Result<'T,exn>
    let querySingle (connection:#DbConnection) (sql:string) (parameters:IDictionary<string, obj> option) =
        try
            let result =
                match parameters with
                | Some p -> connection.QuerySingleOrDefault<'T>(sql, p)
                | None -> connection.QuerySingleOrDefault<'T>(sql)

            if isNull (box result) then Ok None
            else Ok (Some result)

        with
        | ex -> Error ex
Next we will use this file in a module we will call Data that will contain the code and queries for saving and listing the contacts in the database.
Data.fs
namespace Contacts

open Contacts
open System
open System.Data.SQLite

[<RequireQualifiedAccess>]
module Data =

    type ContactEntity = { id:string; firstname:string; lastname:string; email:string }

    // string -> SQLiteConnection
    let private conn (dbname:string) =
        let c = new SQLiteConnection(sprintf "Data Source=%s.sqlite" dbname)
        c.Open()
        c

    let private dbname = "contactsDB"

    // unit -> Result<seq<Contact>,exn>
    let all() =
        let db = conn dbname
        Database.query db "SELECT id, firstname, lastname, email FROM contacts" None
        |> Result.map
            (fun ss -> ss
                    |> Seq.map (fun c -> {
                        Id = Guid.Parse(c.id); Firstname = c.firstname; Lastname = c.lastname; Email = c.email
                        }))

    // Contact -> Result<int,exn>
    let insert c =
        let db = conn dbname
        let entity = { id = c.Id.ToString(); firstname = c.Firstname; lastname = c.Lastname; email = c.Email }
        let sql = "INSERT INTO contacts (id, firstname, lastname, email) VALUES (@id, @firstname, @lastname, @email);"
        Database.execute db sql entity
Of note here is that we use a specific type here called ContactEntity that we use to store and retrieve from the database. Here it was necessary as SQLite does not handle Guid type that we are using for the Id. Even if this was not necessary it is a good practice to separate the boandaries of your application like input and storage from your domain types.
Tying it all together
Remember we need to add the files to the HowToFsharp.fsproj for them to be compiled.
<Project Sdk="Microsoft.NET.Sdk">
  <PropertyGroup>
    <OutputType>Exe</OutputType>
    <TargetFramework>netcoreapp2.1</TargetFramework>
  </PropertyGroup>
  <ItemGroup>
    <Compile Include="Database.fs" />
    <Compile Include="Domain.fs" />
    <Compile Include="Data.fs" />
    <Compile Include="Input.fs" />
    <Compile Include="Program.fs" />
  </ItemGroup>
  <ItemGroup>
    <PackageReference Include="Dapper" Version="1.50.5" />
    <PackageReference Include="System.Data.SQLite" Version="1.0.109.2" />
  </ItemGroup>
</Project>
Now we have all the building blocks we need to tie our application together. Lets flesh out our entry point to use what we have created so far to get our contacts application working.
When the application starts we want to print the menu and get an input. After completing each action we will print the menu again and get an input.
Program.fs
open Contacts

// unit -> Contact list
let getContacts() =
    Data.all()
    |> fun r -> match r with
                | Ok cs -> cs |> Seq.toList
                | Error e ->
                        printfn "ERROR: %s" e.Message
                        List.empty

// Contact -> unit
let insertContact c =
    Data.insert c
    |> fun r -> match r with
                | Ok i -> printfn "%i records inserted" i
                | Error e -> printfn "ERROR: %s" e.Message

[<EntryPoint>]
let main argv =
    Input.printMenu()
    let mutable selection = Input.readKey()
    while(selection <> "0") do
        Input.routeMenuOption selection getContacts insertContact
        Input.printMenu()
        selection <- Input.readKey()
    0
So we print the menu and get a menu option, then we go into a loop of doing that after executing each action with Input.routeMenuOption.
Remember that Input.routeMenuOption takes 2 functions as input to fetch all contacts and insert a contact.
In the Data module we have 2 functions that almost fit the bill. Data.all has a signature of unit -> Result<seq<Contact>,exn> for fetching all contacts as a result, where the result may be an exception. Data.insert has a signature of Contact -> Result<int,exn> with the result of inserting a contact into the database.
At the top of Program.fs we have created 2 functions that wrap the Data module functions, handling errors and then give us the signatures we need for using them in Input.routeMenuOption.
This all just loops in the while loop until the Quit option is selected.
To run our application we execute the dotnet run command like we did near the beginning of this tutorial.
> dotnet run
====================
MENU
====================
1. Print Contacts
2. Capture Contacts
0. Quit
Conclusion
Congratulations for completing your first application! Hopefully you can see that functional programming and F# is not a scary thing and that it is quite possible to write any kind of application in it.
Here are a few ways you could expand this application:
- Move the connection string into a json or yaml configuration file
- Try use a different database
- Try use SQL Provider for the
Datalayer - Try import contacts from a CSV file
- Make this a web api using Giraffe
Next steps
What are some ways of furthering your learnings in F#?
- Check out Exercism is a great way to get some easy practice writing code
- F# for fun and profit is a wealth of F# knowledge and I started out by just reading a little of that every day. I would encourage you to follow along with the script files rather than just read like I did. Nothing beats actually writing code for learning a new language.
- Get Programming with FSharp by Isaac Abraham is a great getting started book
- Domain Modeling Made Functional is one of my favorite F# and DDD books, I highly recommend it once you are a little comfortable with F#.