Overboard: Guestbook example
In this tutorial we will recreate the official Kubernetes Guestbook example. The example deploys a Redis cluster with a master node and 3 replicas. A PHP web application makes use of the Redis cluster to allow a guest to leave a note.
The official example does not currently work if you run it as is but don't worry. We will make adjustments to make sure our deployment runs as expected.
This tutorial will also start to show the power of using a programming language over static configuration.
Topics covered
- Parametrizing and reusing configurations by using functions
- Deployments
- Services
Requirements
- A Kubernetes cluster to learn on such as Kubernetes on Docker or minikube.
- A basic knowledge of using kubectl
- Ingress enabled for your clusterW
- dotnet SDK installed
- Optionally, any IDE that supports F# (Visual Studio Code, IntelliJ Rider, Visual Studio, NeoVim)
Visual Studio Code with the Ionide is a great choice. See Setup your environment for more details.
Configuring a Redis Deployment
In the Hello World tutorial you nested in-line the config. Here we will be defining each resource and assign it to a variable. We then build up our Deployment using the variables rather than in-lining the config.
First off, import the Overboard package and import the namespaces we need.
- Create a file called
guestbook.fsx - Use the
#rdirective to import the Overboard package and open up the namespaces
#r "nuget:Overboard"

// open the required namespaces
open System
open Overboard
open Overboard.Common
open Overboard.Workload
open Overboard.Service
The we are going to create our first function. This function, redisDeployment will return the Deployment resource configuration.
A F# function is just a value, so we use the let keyword to assign the value.
Tip: Start with defining your configuration with hard-coded values, then pull our parameters to pass in as arguments as needed.
/// Return a Redis Kubernetes Deployment Resource Config
let redisDeployment redisName role replicaCount portNumber  =

    // which image depends on the role
    let redisImage = if role = "leader" then "docker.io/redis:6.0.5" else "gcr.io/google_samples/gb-redis-follower:v2"

    // define the container
    let redisContainer = container {
        name redisName
        image redisImage
        containerPort {
            port portNumber
        }
    }

    // build up the list of labels
    let labels = [
        ("app", "redis")
        ("role", role)
        ("tier", "backend")
    ]

    // the pod to use for podTemplate
    let redisPod = pod {
        _labels labels
        add_container redisContainer
    }

    // define the deployment using the same labels used for the pod in the matchLabels
    let redisDeployment = deployment {
        _name redisName
        replicas replicaCount
        add_matchLabels labels
        podTemplate redisPod
    }

    // return the deployment config
    redisDeployment
So now we have a function that can return the config for both our master and replica Redis deployments.
Configuring a Redis Service
Next we need to have a Service to match up to a Deployment. This Service will proxy the traffic to the Redis pods provisioned through the Deployment.empty
We do this the same way as with the Deployment. With a function called redisService.
/// Return a Redis Kubernetes Service Resource Config
let redisService serviceName role portNumber =
    // list the labels
    let labels = [
        ("app", "redis")
        ("role", role)
        ("tier", "backend")
    ]

    // configure the port
    let port = servicePort {
        port portNumber
        targetPortInt portNumber
    }

    // put it together in a Service config
    let redisService = service {
        _name serviceName
        _labels labels
        add_port port
        matchLabels labels
    }

    // return the config
    redisService
This function will provide the Service config when passed the parameters for the service. We can use this for defining a Service for both the master and replica Redis Deployments.
Configuring the Guestbook
The last piece of the puzzle is the web application. The image we are pulling in is of a PHP application but Kubernetes doesn't really care what it is. We just define the image used by the container in the Pod.
So we define a general function for returning the config for a Deployment of an application and the Service to make it available.
/// Return a Deployment and Service for a frontend application connected to Redis
let frontendApp appName imageName replicaCount portName portNumber=
    // pass back a K8s config type (contains both Deployment and Service)
    k8s {
        // add deployment to K8s config
        deployment {
            _name appName
            replicas replicaCount
            labelSelector {
                matchLabels [
                    ("app", appName)
                    ("tier", "frontend")
                ]
            }
            pod {
                _labels [
                    ("app", appName)
                    ("tier", "frontend")
                ]
                container {
                    appName
                    image imageName
                    add_port (containerPort {
                        name portName
                        port portNumber
                    })
                    cpuRequest 100<m>
                    memoryRequest 100<Mi>
                    // environment variables instructing how to find Redis cluster
                    envVar {
                        name "GET_HOSTS_FROM"
                        value "dns"
                    }
                }
            }
        }

        // add service to K8s config
        service {
            _name appName
            _labels [
                ("app", appName)
                ("tier", "frontend")
            ]
            add_port (servicePort {
                        port portNumber
                        targetPortString portName
                    })
            matchLabels [
                ("app", appName)
                ("tier", "frontend")
            ]
            typeOf NodePort
        }
    } // F# returns the last expression of a function. Since the k8s definition is a single expression, it is returned.
In the above function we used a different style to the previous 2. We defined the configuration in a single expression without assigning labels and pods to intermediate variables. Which style you use is up to you and might depend on the complexity of the configuration or you might chose variables for reuse (eg. labels are a common candidate).
Putting it together
Now that we have our functions, we need the values we will be passing into them.
// Capture our values for the Redis and App config
// Redis settings
let leaderName = "redis-leader"
let leaderRole = "leader"
let leaderReplicaCount = 1
let followerName = "redis-follower"
let followerRole = "follower"
let followerReplicaCount = 2
let redisPortNumber = 6379
// Guestbook settings
let guestbookAppName = "guestbook"
let guestbookAppImage = "gcr.io/google-samples/gb-frontend:v5"
let guestbookReplicas = 3
let guestBookPortName = "http-server"
let guestBookPortNumber = 80
Now we put together our final Kubernetes configuration by generating the config by calling the functions we created above. We compose them in a k8s builder to build up our final configuration.
// build up the config by calling the functions
let k8sConfig = k8s {
    // Redis master deployments and service
    redisDeployment leaderName leaderRole leaderReplicaCount redisPortNumber
    redisService leaderName leaderRole redisPortNumber
    // Redis replica deployment and service
    redisDeployment followerName followerRole followerReplicaCount redisPortNumber
    redisService followerName followerRole redisPortNumber
    // Guestbook app (combines that K8s instance with the current one)
    frontendApp guestbookAppName guestbookAppImage guestbookReplicas guestBookPortName guestBookPortNumber
}
We use KubeCtlWriter to write a YAML (or JSON if you prefer) file that we can use to deploy our configuration to Kubernetes.
Tip:
__SOURCE_DIRECTORY__contains a string to the directory the that the script file is running in.
// write the file
KubeCtlWriter.toYamlFile k8sConfig $"{ __SOURCE_DIRECTORY__}{IO.Path.DirectorySeparatorChar}guestbook.yaml"
Test out the configuration you have created by applying it to your Kubernetes cluster.
|
You should see something similar to this:
|
To test out the application, open up a port to 80, where the guestbook application is running.
|
81 is the port you can access the app on your side. You can choose a port you prefer here.
Navigate to localhost:81 and you should see the application.
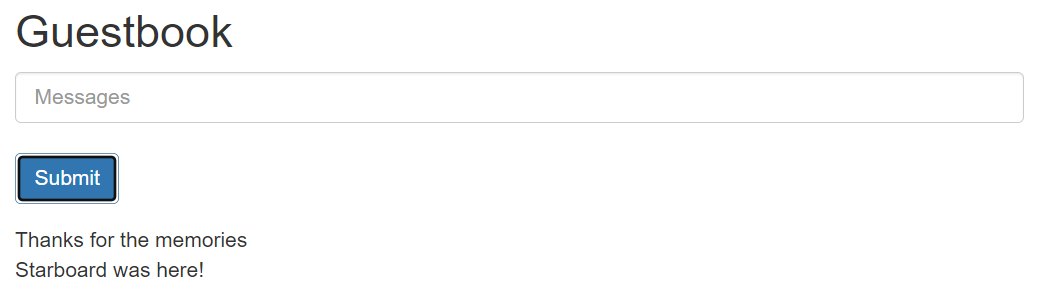
Go ahead and leave a note.
Conclusion
In this tutorial we defined a more complicated configuration than hello-world.
- We saw how you can extract repetitive configuration into functions and then use that function to generate similar configuration multiple times.
- We also saw how using values allowed us to reuse those values by reference rather than having repeating values like names even when calling our functions.
- We demonstrated different styles available and say how we can not only compose resources like a Deployment but can also compose full Kubernetes configurations into combined ones.
Return a Redis Kubernetes Deployment Resource Config
<summary> A single application container that you want to run within a pod. https://kubernetes.io/docs/reference/kubernetes-api/workload-resources/pod-v1/#Container </summary>
<summary> Labels for the Pod </summary>
<summary> Name of the Deployment. Name must be unique within a namespace. https://kubernetes.io/docs/reference/kubernetes-api/common-definitions/object-meta/#ObjectMeta </summary>
<summary> Add multiple label selectors to the Deployment. </summary>
Return a Redis Kubernetes Service Resource Config
<summary> Name of the Service. Name must be unique within a namespace. https://kubernetes.io/docs/reference/kubernetes-api/common-definitions/object-meta/#ObjectMeta </summary>
<summary> Labels for the Service </summary>
<summary> Add multiple label selectors to the Service. </summary>
Return a Deployment and Service for a frontend application connected to Redis
<summary> A label selector is a label query over a set of resources. https://kubernetes.io/docs/reference/kubernetes-api/common-definitions/label-selector/#LabelSelector </summary>
<summary> Millicpus: 1000m = 1cpu </summary>
<summary> Mebibytes </summary>
<summary> Type of the Service. </summary>
<summary>Performs operations on <see cref="T:System.String" /> instances that contain file or directory path information. These operations are performed in a cross-platform manner.</summary>